Wednesday, March 30, 2016

Moda Love Quilt 2


This quilt was designed and made for a relative that has Stage 4 cancer. I was heartbroken to hear this sad news, and while there isn't much I can do, I thought a bright handmade quilt may help cheer her up. I wanted to make it lap sized so she could take it to her chemo appointments to keep her warm.


I think the first Moda Love quilt I made turned out beautifully so I was debating about making that quilt again or something different. In the end, the quilt I made was essentially a Moda Love quilt with some minor changes. The center unicorn piece is done using an 8.5" by 8.5" square and adding the purple onto it. Since I counted my diagonal seam allowance wrong, the block finished out at 7.5" by 7.5" (an inch too small). Thus, I added a one inch (cut 1.5") border of teal with gold around it. I'm using this teal for binding, so I like how it is echoed in the center. The rest of my changes are pretty easy to see. The Moda Love Pattern is free from Moda and can be found here (This quilt is the charm size).

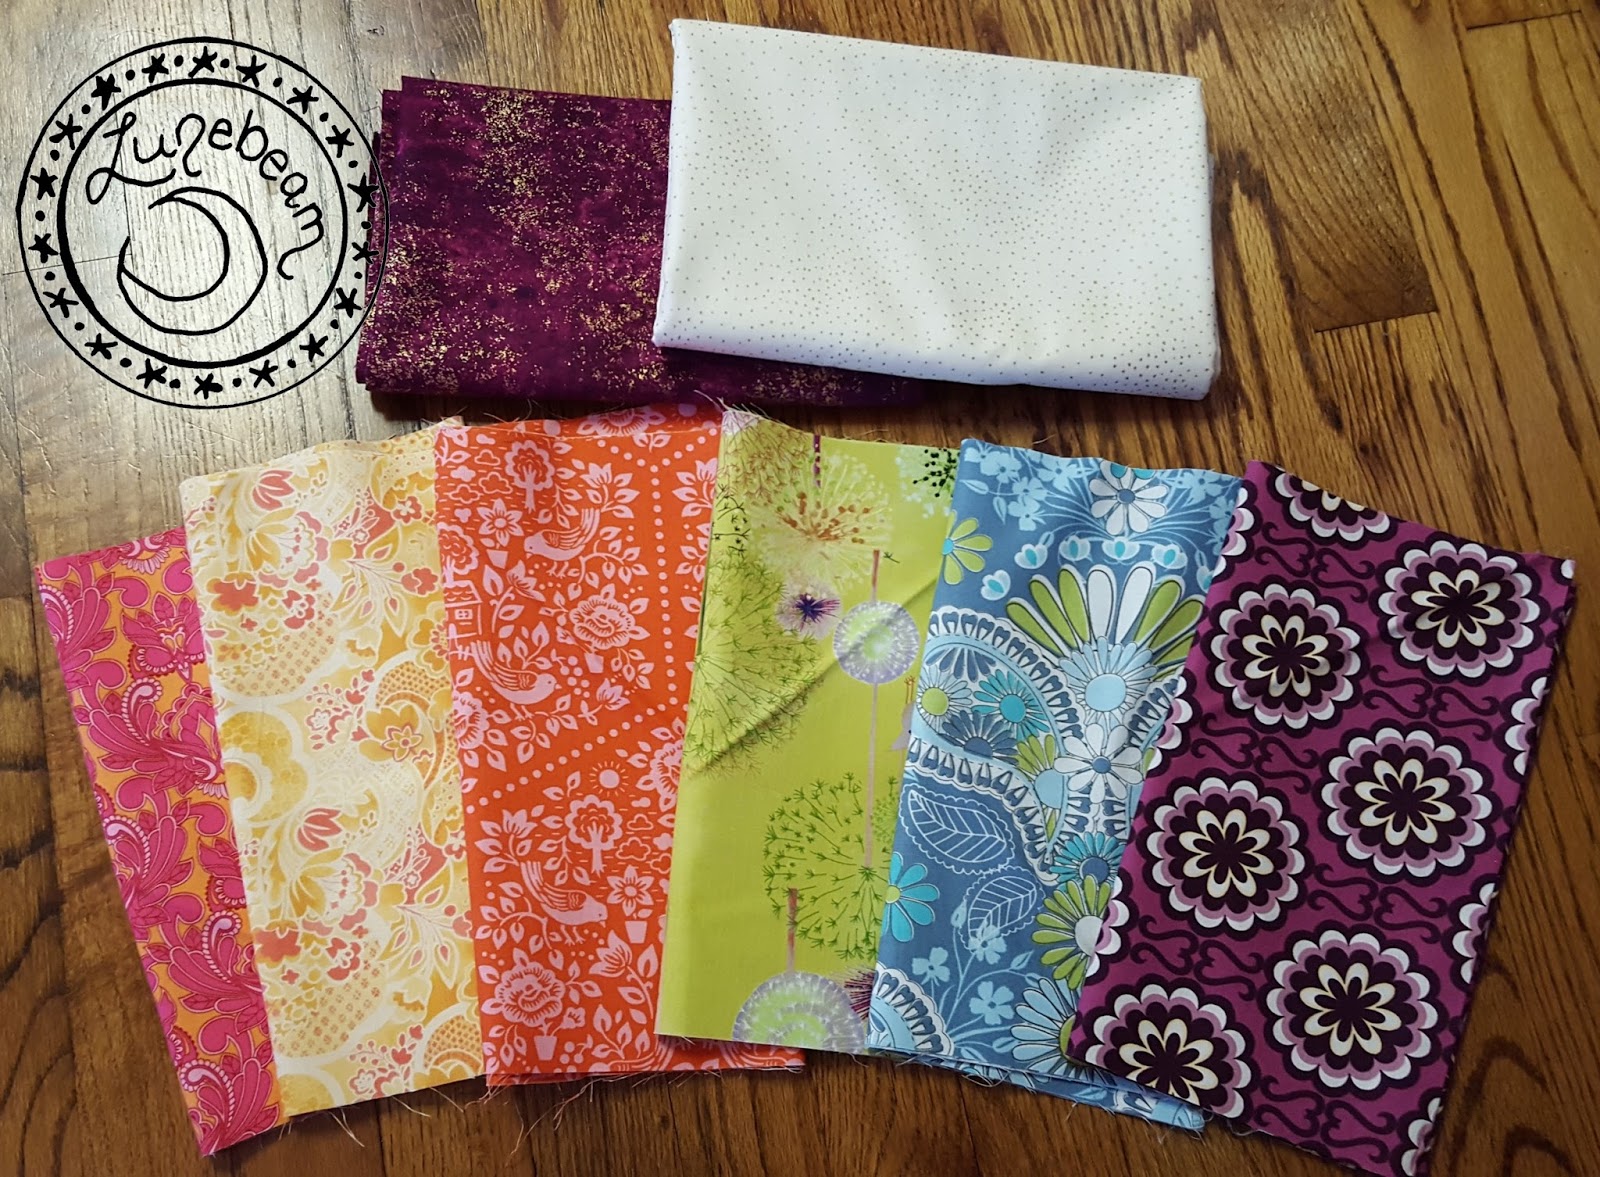
The fabrics for this quilt are a real assortment. Basically I went into a quilt shop I frequent called Thread Bear Fabrics and browsed. They have a huge selection so I had lots of options. I knew I wanted a rainbow of colors so I picked a fabric I liked, and then set to matching it. My husband is a great sport and helped me out through this process!

The purple with gold in the top left was not actually used in this quilt. I went with the teal with gold instead (not shown).


I ended up with the following (from left to right in the picture above):


For all of the 6 rainbow fabrics, I got a quarter of a yard cut. I then cut a 5 inch strip off of each color. Because Thread Bear often cuts generously, the remaining portion was anywhere from 4.5 to 6 inches. I put these aside for the backing. I then cut my 5 inch strip into 8, 5" by 5" squares. This gave me 48 charm size squares to work with. I had a good amount left over.


I also cut two 5" strips and one 4.5" strip from my cream with gold dot fabric. I then cut these down into squares.

The center block turned out a little smaller than expected, so I added a little border to it.
The border is the same fabric as the binding.
I then used my notes to make my blocks accordingly. Please note I took extra care to ensure that all my directional fabrics were sewn so they all went in the same direction on the quilt. This will take some extra time and planning, but it would have bothered me if they went different directions.

The white used is actually a creme colored fabric with gold dots. I am in love with it. To me it is the perfect cream solid/blender. How does every shop not have bolts of this?!

Debating what color to border the center block with and bind the quilt with. The teal on the right won.

The binding is a teal marble fabric with gold on it. It is also gorgeous. I guess I just really like the fabrics with the metallic sparkle to them.

Ready for quilting now
For the backing, I used all my scraps from the rainbow fabrics. This wasn't quite enough, so I added a 5 inch strip of cream with gold dots. I didn't use a ruler to measure my backing before adding the cream and estimated how much cream to add. Turns out 5 inches of cream made the back exactly the same size as the top. I knew I could make this work with careful alignment, but next time I would use 6 or 7 inches.

After quilting, before binding
I then did simple straight line quilting in all the joins of the fabrics. I took extra care not to go through any of the color pieces.

The quilt is finished. Before (left) and after (right) being washed.


I think the back turned out beautifully and couldn't be happier with it. I really hope it brings a smile to her face!

The back of the quilt, without the label yet.

The label I made for it, with names omitted

This quilt seemed to compliment spring perfectly

Made and quilted in March 2016. Finished size approximately 32" by 32".

Thursday, February 18, 2016

Moda Love Quilt


I was looking for a charm pack quilt to make as a baby gift and found the Moda Love Quilt (click for free PDF download link!). Since Moda makes most of the charm packs sold, their website is a great source of additional patterns that utilize all their precut shapes (eg charm packs, layer cakes, jelly rolls, etc).

If you Google or Instagram search for Moda Love Quilt, you'll be able to see lots of other designs based on the same pattern. This is really a great pattern that looks so different dependent on fabric choice and placement!

All my fabrics for the quilt top are ready to go!
For my quilt, I used fabrics from Spirit by Lila Tueller for the top and binding. The backing is an organic cotton by Cloud 9 from their Backyard Garden collection. My friend thinks her baby will be a girl, but they decided not to find out the gender. Thus, I wanted my quilt to have some pink in it, but not be entirely pink and purple.

The steps of making the blocks. From left to right: 
1. Drawing the diagonal and sewing on either side 2. Cutting along the diagonal, 3. Pressing open 4. Squaring up

The charm pack size is perfect for a small baby blanket, so I'll be keeping this pattern in mind in future!

From quilted to getting the binding attached!


Finished size: approximately 32 inches by 32 inches


Cut and Pieced: February 12, 2016
Quilted: February 12-13, 2016
Bound: February 14-15, 2016

Monday, February 8, 2016

Scraps

Made from the scraps from my Triangle Quilt
When cutting the fabric for projects, I end up with a fair amount of scraps. I have just been tossing them in my Sephora boxes, but recently, they've begun to overflow. Hence, I am trying to make a quilting block from my scraps as I go. The hopeful result is that eventually I will have amassed enough scraps to piece them together to make a quilt.

It started with me making two very simple blocks from the scraps of the Tula Pink drawstring bags I made (I ended up with 8 squares from each bag, so they really begged to be pieced with some other scraps I had in the leftover box). This was so simple and fast to do at the end of the project that I didn't think much of it.


I then began looking at the scraps from my triangle quilt (see my triangle quilt posts here: Part 1 , Part 2 , and Part 3). While cutting the equilateral triangles out, I would end up with roughly half of an equilateral triangle left at end of the row. Since I had so many similar triangles left, I figure I should do something with them. Thus I played with them one night while watching TV. A while later, I was in the mood to make some blocks, so off I went assembling 6 hexagons from them. While the hexagons do take a while to make, the fact that they were already cut and arranged made them super easy to build. I love the result that they gave!

One of the hexagons created from the scraps of my triangle quilt. This hexagon is all fabric from Tula Pink's Eden line.
I am waiting to make them into square block until I know what quilt they will go into (and thus what color to use).

I am hoping in 2016 and on, I will make more use of my scraps as I go!

My six hexagons from the scraps of my triangle quilt. I love the tiger eyes that look out!

Tuesday, February 2, 2016

Triangle Quilt - Part 3 finished quilt top


Note this post the third in a series on my triangle quilt project. Click to view Part 1 or Part 2.


I have finished the quilt top of the triangle quilt! I have never done triangles prior to this quilt, so this was truly a learning experience. I must say by the time I was halfway through piecing the rows, my triangle assembly was notably better with few errors. Sadly, this meant my errors in the early rows were now very obvious to me, and I ended up separating and redoing a lot of my early piecing.


I am just so happy to finally have the top pieced! It is now waiting to be assembled, but all my safety pins are currently tied up in other projects. This is probably a good thing since I have two quilts half quilted at home, and I really need to finish those before I start a third. They are just taking a little longer than I thought since I am trying to do free motion quilting on them. Keep a look out for a post on those in future!


I think when this is assembled, I will go with a nice simple straight line quilting method. This is the largest quilt top I have made to date, and I do not think my little sewing machine could do anything besides a straight stitch on a quilt this size.

I have some beautiful Tula Pink Free Fall wide backing in Lipstick for the backing of this quilt. A Tula Pink triangle quilt definitely needs Tula Pink backing!


Some production pictures are below. I hope you enjoy!

Triangles ready to be pressed
Pressing! I usually press to one side, but you could also press your seams open
Piecing at my machine
Checking my row layout


Saturday, January 23, 2016

Airport Sling from On the Go Bags


Early in December, I followed along on a blog hop about a new book called On the Go Bags. As luck would have it, I ended up winning my own copy of the book, thanks to Radiant Home Studio.


It arrived on Thursday and I couldn't wait to look inside! After looking through the projects online, I had my eye on the airport sling. Sure enough, when the book came, that's what I had to make first! I love the zippered exterior pocket and had no clue how to do this without some guidance!

Since Friday was a snow day, I decided that would be a great time to start. Please note that while we did get snow here, nothing stuck on the ground to my great disappointment!

For the outer fabrics, I chose:


Inside I used:


All fabrics, except the horses (Tula Pink's Pony Play, used on the exterior pockets) are currently in print or easily available (Tula Pink's Tent Stripe in Plum is in a past collection), so you can almost make an identical bag if you want! With a silvery white and black being the main base of the bag you could really use any print you love for the pockets!

All fabrics cut and ready to go!
With my fabrics picked, I was off to cutting! The book has great instructions to speed cut the up the cutting process, but since I had directional fabrics and I wanted to fussy cut, I took my time. I especially wanted those ponies to be cut carefully so that the pocket flap on the front would line up perfectly with the pocket.

I then added interfacing to more than what was suggested in the pattern since I was using quilting weight fabrics for a lot of the bag. Interfacing is not my favorite, but I have yet to find an effective way around it for projects like this!

I love the pony fabric and I am so happy I took the time to carefully cut it
Other than that, I pretty much followed the pattern exactly but added an interior zip pocket, change the strap style, and made my strap non-adjustable (I rarely adjust my bag straps, and I lacked the needed hardware at home). My liner ended up being a good 1 to 2 inches shorter than the outer bag for some reason, so I added a second line of color between the facing and the main fabric (listed above as the accent color). I may have cut or sewn something wrong, but that was easy enough to fix!

By far the hardest part was attaching this zipper pocket
I must say that the zippered exterior pouch is hard to do. This part is not for beginners, and it would be easy to leave this off if you can't initially make it work. This is what attracted me to the pattern though, so I had to make it, even if I had to rip out my seams a few times!

This pocket fits credit cards and a passport in it!
Sorry I don't have any good interior shots. The inside is not anything special. The bag closes with a magnetic purse closure. It's the first one I've ever done, but it came with good instructions. It was amazingly simple to install too!


-------------------------------------------------------------------
For those interested, you can see the entire blog hop  about the book, On the Go Bags, is below. The blog hop was December 1st to 13th, 2015, so sadly all the contests are now closed, but you can still see some great images of the projects from the book:

Tuesday, Dec 1: Shannon Fabrics / Sew Sweetness
Wednesday, Dec 2: Clover & Violet / Ann Kelle
Thursday, Dec 3: Radiant Home Studio / Melly Sews
Friday, Dec 4: Sew Caroline / Mia’s Creations
Saturday, Dec 5: ikat bag / imagine gnats
Monday, Dec 7: sewVery / The Girl Inspired 
Tuesday, Dec 8: Stash Books / Fabric Mutt
Wednesday, Dec 9: Pellon
Thursday, Dec 10: Simple Simon and Co / Mrs. H
Friday, Dec 11: Emmaline Bags / Lindsay Sews
Monday, Dec 13: Sew, Mama, Sew

Tuesday, January 19, 2016

Lined Drawstring Bags

I thought I would do a quick post showing some of the lined drawstring bags I have made. These are a great little project that can serve so many uses!

Two of my drawstring bags. One I use to carry my knitting as you can see!
The pattern came from the book School of Sewing by Shea Henderson. This is the same book I used to make the unicorn pillowcase. It is an excellent resource for someone who is just starting to sew.


My first few drawstring bags were made from fabrics left over from my Halloween Quilt. The newer drawstring bags have been made using Tula Pink fabrics.

The three drawstring bags that I kept. Pictured in the car on a road trip!
I definitely prefer the look of the Tula Pink bags, but that may be because it is no longer October! I do not have pictures of all the bags I have made, since some have been given away as gifts and I forgot to photograph them!

Two of the drawstring bags visiting a community farm in Savannah, GA.

The cut fabric for one bag waiting to be sewed

Being sewed on my machine

My two Tula Pink drawstring bags immediately upon completion

A drawstring bag hanging out in my Cargo Duffel


Monday, January 4, 2016

Cargo Duffle


The Cargo Duffle visiting a community garden in Savannah, GA

I wanted to make a larger travel bag for my holiday adventures. After looking around a little, I saw the Cargo Duffle by Noodlehead. The pattern is free download and can be found here!

The Cargo Duffle was made in December 2015, but I'm only getting around to posting it now.


I haven't made a quilted bag yet so I thought this was a perfect opportunity to try it out. I also love the pleated cargo pockets on the front, so this gave me an opportunity to learn how to do them. While fussy cutting the fabric for them was time consuming, the actual construction was not that bad.


The fabrics I used are as follows:
  1. Main body (outside and inside): Helios in the Fibs and Fables collection by Anna Maria Horner
  2. Accent on main: Soho Chic Bubbles in Plum by Sandy Gervais for Moda
  3. Cargo pockets: Cachet by Marie Osmond in Quilting Treasures collections (I believe this is out of print since I got this fabric in a fat quarter sale a while ago)
  4. Zipper Gusset (outside and inside): Minutes in the Fibs and Fables collection by Anna Maria Horner
  5. Bottom Gusset: 
  6. Handles: 
    • Accent: Soho Chic Bubbles in Plum by Sandy Gervais for Moda
    • Main: organic black canvas
  7. Inside binding: Bella Cotton Solids in Black by Moda


I used more variety of fabrics than the pattern called for, but I wanted a nice colorful bag. The only other thing I changed was I made the handles a little longer. I also did sew parts of the handles together to make a thinner strap after using the bag for a while. I found the original size was too wide for my liking since it kept bunching up on my shoulder.


I love the Pegasus pattern so much that I got some extra yardage for later projects! I'll definitely be looking into more Anna Maria Horner prints!


Since I was in such a nice location for the holidays, I took some bonus pictures of the Butterick 5658 tote bag I made!