Tuesday, May 24, 2016

1600 Inch Quilt Top / Jelly Roll Race Quilt Top


I have seen pictures of people's 1600 inch quilt tops before, so I decided I wanted to give this try. The 1600 inch quilt, or jelly roll race quilt, is a simple quilt top made from a single jelly roll (set of 40, 2.5" strips of fabric that are WOF long). There are many directions on how to make this online. Mine was done using the 45 degree join with removing 18 inches off of the first strip to offset the seams. You then sew both ends together and cut at the end a total of 5 times. I must say, that first strip you start with (it ends up being approximately 1600 inches long) is very unruly and tangled. I had my husband help me untangle it before I got started!


For my jelly roll, I used one containing Tula Pink's Spring 2016 line, called Chipper. Just looking around online, you can really see how different fabrics will give a completely different result!


This is a great beginner quilt top that produces a good size quilt. My quilt top finished out at 49.5 inches by 67 inches.

Made May 1-2, 2016.

The entire 1600 jelly roll quilt top!

Sunday, May 1, 2016

AGF - The Christina Clutch


Art Gallery Fabrics (AGF) has a great tutorial on their blog on how to make The Christina Clutch. When I saw this tutorial, I immediately thought of my sister and set about making her a surprise gift. She likes blues and grays, so those are the colors I focused on for the clutch.


She, like myself, really enjoys the Clover and Crickets by Heather Ross, so I use that for the liner (used is the bright green color with yellow flowers, but it was made in three colors).

The bow is done in Tula Pink's Swarm in Indigo from her Moon Shine collection. The main outside is done from the blue boarder fabric from Heather Givans' Succulent collection (I had a lot of this left over since the boarder is only along one selvage edge and not both like I thought it would be).

All my fabrics cut and ready to go!
This is a very quick project and can easily be done in a day. I followed the tutorial exactly, except that I quilted my outer pieces to batting and a plain cotton backing (instead of adding interfacing). Hence, there is some batting and cotton backing shown above instead of interfacing. The quilting allows the bag to hold shape and I think my substitution worked well!

I also added a little D-ring so a an optional strap could be added later. I just did this using a scrap of the main fabric to make sure everything matched.

Wednesday, April 13, 2016

Quilted purse


I wanted to make myself a new everyday bag. I love the Helios pattern by Anna Maria Horner that I used on the Cargo Duffle by Noodlehead (The Cargo Duffle pattern can be found here). Sadly the Cargo Duffle is way too big as an everyday bag. It would be nice to have this new bag match it though for trips, so I wanted the Helios print to be base color. I didn't want to make a smaller version of the same bag, so I set about creating my own pattern to use.

The Cargo Duffle (left) and the new bag. The new one is shorter and taller than the Cargo Duffle.
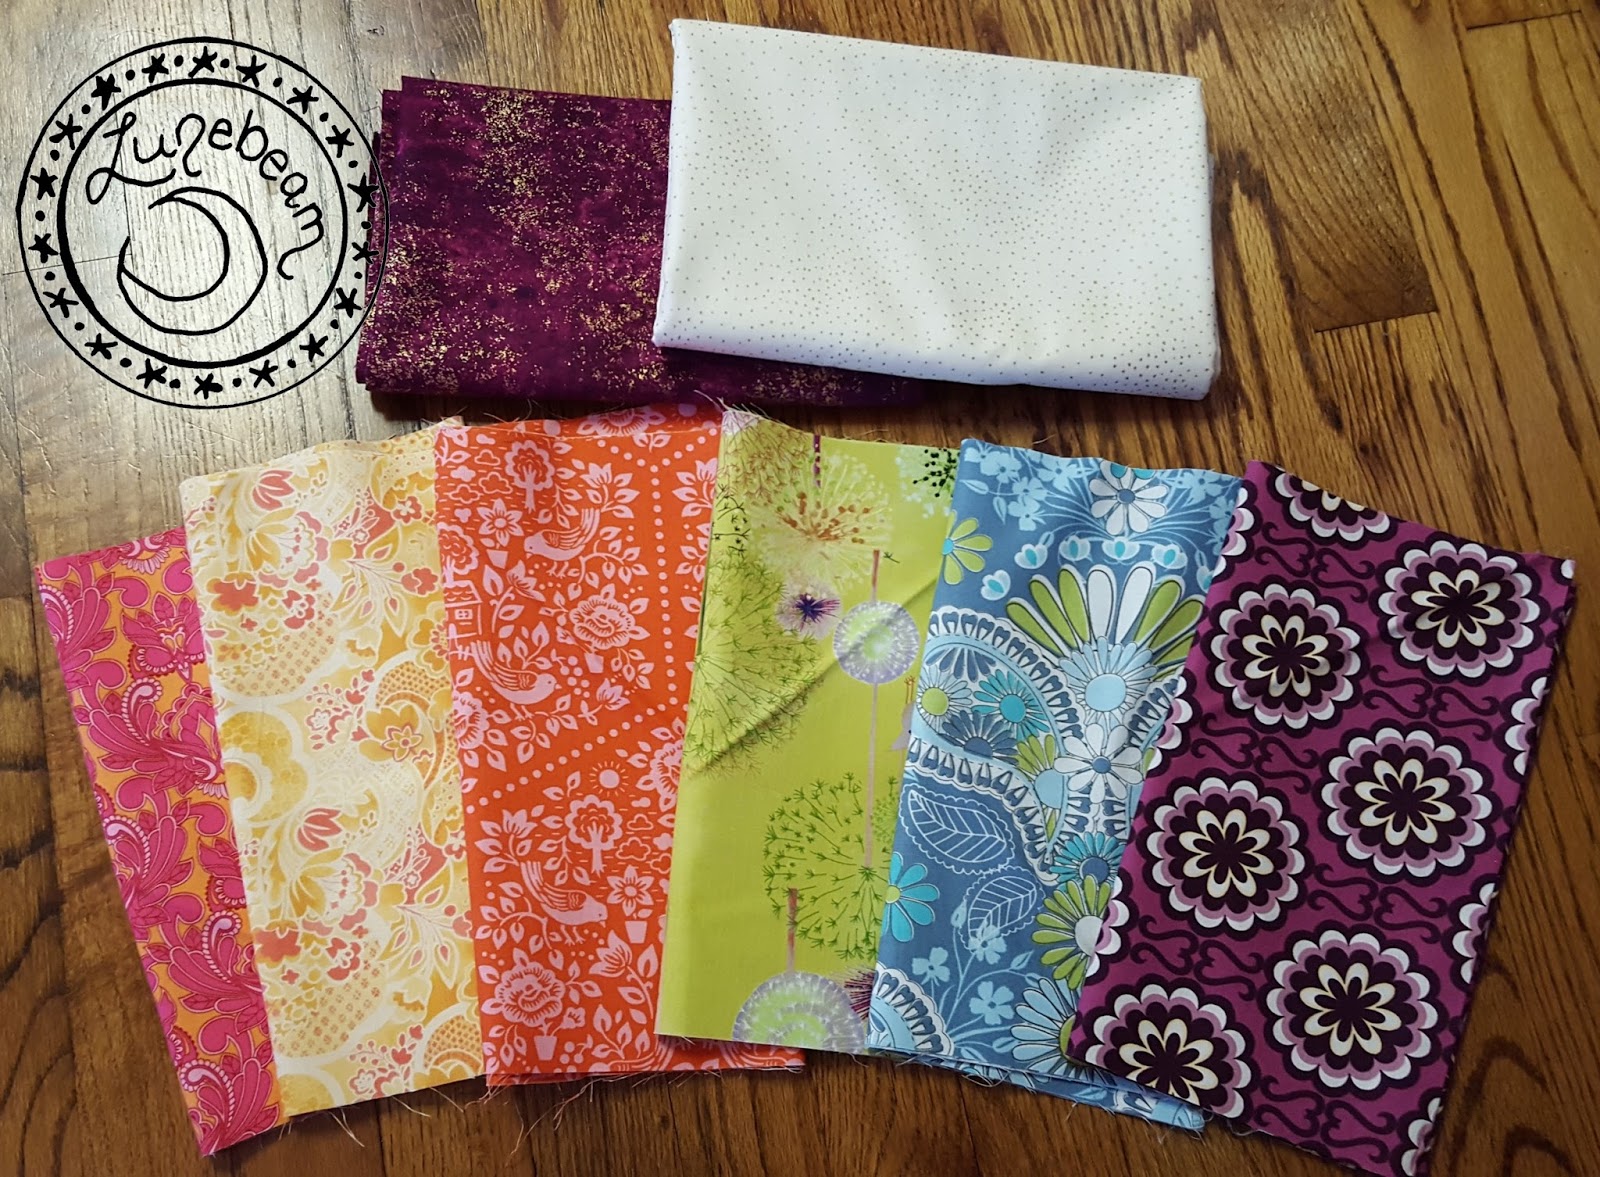
I went to Thread Bear Fabrics while I was in Georgia and had fun searching for some matching prints. Thread Bear is a wonderful, family run, quilt shop that has an amazing selection of fabrics at very good prices. They frequently run sales, so be sure to sign up for their email newsletter.

My wonderful husband helped me pick out some fabrics to use. He was the one who found the beautiful plum with gold fleck fabric. It was in the Christmas section, so I had gone right by it!

We then had to match a print for the front and back pocket to Helios, the plum, and my canvas color of black. This proved to be more difficult since I wanted a print I could fussy cut. Eventually I found a print called Fortuna by Tina Givens in her Chole's Imagination collection. This is an older collection, so not many prints were left, but I fell in love with yellow star flower. I also have a new love for Tina Givens, so expect to see more of her fabrics in my work!

The parts of the bag prior to assembly. Top-down:
outside of the bag, inside of the bag, zipper and ends
With my fabrics picked I set to designing the pattern. This bag was really made to accommodate the star flower on the front and back, so I based my dimensions around this.

I knew I wanted my straps to come down the front of the bag and I wanted to hide my pocket ends under these straps. I liked the accent base color technique (plum with gold fabric) so I used that to hide my raw edges for the pocket and straps in.

I took advantage of these straps to hide the extra seams created for the inside pockets. I love pockets in my bags, and by my standard, this bag actually doesn't have that many. I plan on making an extra zipper pouch or two for organization.

I debated for a while how I wanted to do the sides of my bag. I thought about attaching the zipper directly to the front and back panels and doing a triangular shaped side. I decided against that for now, but I may do that later. I went with a continuous zipper to base panel and I rounded out the top of my bag to minimize points. It took some math to get the dimensions right, but it turned out great in the end!


I also decided to use a metal zipper again on this bag, but I fixed the ends so they open from the center and act like act purse zipper. While I don't like metal zippers at first, once they wear in a bit, they are much better.

TIP: a fast way to break in a metal zipper is to draw on the teeth with a regular pencil. The graphite will help lubricate the zipper. They sell liquid graphite for this purpose, but it can be more expensive and may stain (when we had our house re-keyed, the guy at the hardware store used the liquid graphite to loose up the new stiff lock).


Designed and made March 2016

Monday, April 4, 2016

Butterick 5658 Take 2


Note: This is the second Butterick 5658 Tote that I have made. To see my first one, please click here!

I love my Butterick 5658 tote so much that I decided to make a second one. I really wanted a bag with unicorns on it, so I thought this would be a perfect bag to show them off on!

Interior shots of the bag. The top right picture shows the additional zipper pouch I added for easy access to small items.
This bag is almost the same, but with different fabrics, as my first tote. I did change three very small things though. First, I added a small zippered pouch on the liner above the main zipper. I did this so I could access small items without having to open my entire purse (This is really because I love my chapstick and found it cumbersome to have to go under the main zipper to get it). I think the interior slip pockets may be a little different too, as I didn't write down the dimensions I used before. Second, I changed the handle a little. I widened it and lined it with some fabric (note, how I do my handles is completely different than in the pattern. I also add zippers to the interior which are not listed in the pattern). My old handle was getting a little stretched from use, so I am hoping this will be a better system. Third, I added some snaps to secure my main top zipper (this zipper is not in the pattern either). These snaps will hold the ends up the zipper closed to the sides of the bag, making it very difficult for anything to fall out. So far, I am really enjoying these small improvements that I made!

The pattern for Butterick project number 5658 can be found anywhere Butterick patterns are sold. I happened to get mine at my local Hancock Fabrics store when it was on sale over Black Friday.


Fabrics used:

Outside:
  • Side accents, strap, and base - Organic plum canvas
  • Main panel - Heather Ross' Far Far Away 3 Collection Unicorns on cream
  • Side panel and strap lining - Heather Ross' Far Far Away 3 Collection
  • Piping accent - Moda Bella solid in black

Inside:
  • Top facing - Heather Ross's Briar Rose Clover in 
  • Main lining - Heather Ross's Briar Rose Frog Family in lilac 
  • Zipper sides - Heather Ross's Briar Rose Bee in purple
  • Slip pockets - Assorted Heather Ross fabrics from my scrap pile

Just a forewarning, Heather Ross' Briar Rose and Far Far Away collections are out of print now. You may be able to find some online, but they will likely be costly.


Wednesday, March 30, 2016

Moda Love Quilt 2


This quilt was designed and made for a relative that has Stage 4 cancer. I was heartbroken to hear this sad news, and while there isn't much I can do, I thought a bright handmade quilt may help cheer her up. I wanted to make it lap sized so she could take it to her chemo appointments to keep her warm.


I think the first Moda Love quilt I made turned out beautifully so I was debating about making that quilt again or something different. In the end, the quilt I made was essentially a Moda Love quilt with some minor changes. The center unicorn piece is done using an 8.5" by 8.5" square and adding the purple onto it. Since I counted my diagonal seam allowance wrong, the block finished out at 7.5" by 7.5" (an inch too small). Thus, I added a one inch (cut 1.5") border of teal with gold around it. I'm using this teal for binding, so I like how it is echoed in the center. The rest of my changes are pretty easy to see. The Moda Love Pattern is free from Moda and can be found here (This quilt is the charm size).

The fabrics for this quilt are a real assortment. Basically I went into a quilt shop I frequent called Thread Bear Fabrics and browsed. They have a huge selection so I had lots of options. I knew I wanted a rainbow of colors so I picked a fabric I liked, and then set to matching it. My husband is a great sport and helped me out through this process!

The purple with gold in the top left was not actually used in this quilt. I went with the teal with gold instead (not shown).


I ended up with the following (from left to right in the picture above):


For all of the 6 rainbow fabrics, I got a quarter of a yard cut. I then cut a 5 inch strip off of each color. Because Thread Bear often cuts generously, the remaining portion was anywhere from 4.5 to 6 inches. I put these aside for the backing. I then cut my 5 inch strip into 8, 5" by 5" squares. This gave me 48 charm size squares to work with. I had a good amount left over.


I also cut two 5" strips and one 4.5" strip from my cream with gold dot fabric. I then cut these down into squares.

The center block turned out a little smaller than expected, so I added a little border to it.
The border is the same fabric as the binding.
I then used my notes to make my blocks accordingly. Please note I took extra care to ensure that all my directional fabrics were sewn so they all went in the same direction on the quilt. This will take some extra time and planning, but it would have bothered me if they went different directions.

The white used is actually a creme colored fabric with gold dots. I am in love with it. To me it is the perfect cream solid/blender. How does every shop not have bolts of this?!

Debating what color to border the center block with and bind the quilt with. The teal on the right won.

The binding is a teal marble fabric with gold on it. It is also gorgeous. I guess I just really like the fabrics with the metallic sparkle to them.

Ready for quilting now
For the backing, I used all my scraps from the rainbow fabrics. This wasn't quite enough, so I added a 5 inch strip of cream with gold dots. I didn't use a ruler to measure my backing before adding the cream and estimated how much cream to add. Turns out 5 inches of cream made the back exactly the same size as the top. I knew I could make this work with careful alignment, but next time I would use 6 or 7 inches.

After quilting, before binding
I then did simple straight line quilting in all the joins of the fabrics. I took extra care not to go through any of the color pieces.

The quilt is finished. Before (left) and after (right) being washed.


I think the back turned out beautifully and couldn't be happier with it. I really hope it brings a smile to her face!

The back of the quilt, without the label yet.

The label I made for it, with names omitted

This quilt seemed to compliment spring perfectly

Made and quilted in March 2016. Finished size approximately 32" by 32".

Thursday, February 18, 2016

Moda Love Quilt


I was looking for a charm pack quilt to make as a baby gift and found the Moda Love Quilt (click for free PDF download link!). Since Moda makes most of the charm packs sold, their website is a great source of additional patterns that utilize all their precut shapes (eg charm packs, layer cakes, jelly rolls, etc).

If you Google or Instagram search for Moda Love Quilt, you'll be able to see lots of other designs based on the same pattern. This is really a great pattern that looks so different dependent on fabric choice and placement!

All my fabrics for the quilt top are ready to go!
For my quilt, I used fabrics from Spirit by Lila Tueller for the top and binding. The backing is an organic cotton by Cloud 9 from their Backyard Garden collection. My friend thinks her baby will be a girl, but they decided not to find out the gender. Thus, I wanted my quilt to have some pink in it, but not be entirely pink and purple.

The steps of making the blocks. From left to right: 
1. Drawing the diagonal and sewing on either side 2. Cutting along the diagonal, 3. Pressing open 4. Squaring up

The charm pack size is perfect for a small baby blanket, so I'll be keeping this pattern in mind in future!

From quilted to getting the binding attached!


Finished size: approximately 32 inches by 32 inches


Cut and Pieced: February 12, 2016
Quilted: February 12-13, 2016
Bound: February 14-15, 2016

Monday, February 8, 2016

Scraps

Made from the scraps from my Triangle Quilt
When cutting the fabric for projects, I end up with a fair amount of scraps. I have just been tossing them in my Sephora boxes, but recently, they've begun to overflow. Hence, I am trying to make a quilting block from my scraps as I go. The hopeful result is that eventually I will have amassed enough scraps to piece them together to make a quilt.

It started with me making two very simple blocks from the scraps of the Tula Pink drawstring bags I made (I ended up with 8 squares from each bag, so they really begged to be pieced with some other scraps I had in the leftover box). This was so simple and fast to do at the end of the project that I didn't think much of it.


I then began looking at the scraps from my triangle quilt (see my triangle quilt posts here: Part 1 , Part 2 , and Part 3). While cutting the equilateral triangles out, I would end up with roughly half of an equilateral triangle left at end of the row. Since I had so many similar triangles left, I figure I should do something with them. Thus I played with them one night while watching TV. A while later, I was in the mood to make some blocks, so off I went assembling 6 hexagons from them. While the hexagons do take a while to make, the fact that they were already cut and arranged made them super easy to build. I love the result that they gave!

One of the hexagons created from the scraps of my triangle quilt. This hexagon is all fabric from Tula Pink's Eden line.
I am waiting to make them into square block until I know what quilt they will go into (and thus what color to use).

I am hoping in 2016 and on, I will make more use of my scraps as I go!

My six hexagons from the scraps of my triangle quilt. I love the tiger eyes that look out!